Estimator wizard
What is the wizard?
The wizard is a tool for estimating data acquisition time for spectromicroscopic imaging at mid-IR beamline. Using the tool, you can interactively change the objective, image area, number of scans, spectral resolution and binning.
Why do I need this information?
The wizard allows you to plan your beamtime by knowing the data collection time for each area of interest. With the move to mail-in and remote access this information is incredibly valuable and will improve your experience and assist in realizing your experimental goals.
Who can use it?
The wizard is for mail-in, remote access and experiment planning.
Find the estimator wizard > https://midir-sampler.lightsource.ca
Wizard Guide
Purpose: guide to using estimator wizard for mail-in, remote access or experiment planning
Address https://midir-sampler.lightsource.ca
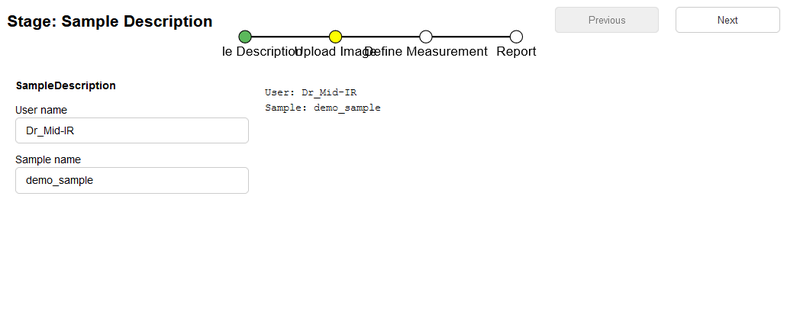
Stage: Sample Description
Enter your name and simple description of sample.
User name:
Sample name:
Stage: Upload Image
Select image that represents the sample you intend to measure at mid-IR
Best: actual visible microscope image of the sample you send to Mid-IR
Good: similar visible microscope image of the sample you send to mid-IR
The image needs to have the dimensions known, or a feature (or fiduciary mark) of known size that the size of the image can be calculated
Browse... click button and navigate to the file you are going to use
File path: will be populated when you upload the image
Dims: here enter the dimensions of the image in micrometers
Origin: leave this at (0,0) ** Location of easy to find and identify mark. Can be left at 0, 0 for now
Extent: ** This can be ignored, it's the locations of the top left / bottom right of the image corners but is always calculated from dimensions and origin

Stage: Define Measurement
Define the region of interest (ROI) on your sample
add points using (x,y) coordinates that you are interested in and a box will be generated that includes every specified points.
** if you want to image two different areas on the sample sample image and it doesn't make sense to image all the area in between them, create a separate report for each area of interest (soon this will all be done in a single report)**
User ref: ** Location to measure reference (background). Should be a region of the substrate window which is clear of material (yellow box)
User roi pts: format: [(x1,y1), (x2,y2), (x3,y3), ...]; seen on image as pink dots
Microscope: select magnification you plan on using
Resolution: wavenumber resolution, default is 4 cm-1, leave it at this unless you have reason to need different resolution
Scans: number of co-added scans will be collected, default 32 scans; choose based on spectrum signal to noise
Binning: groups a number of pixels together when collecting data, changes the size and collection time, cannot be undone in data reduction/analysis stage. If you are unsure about this, consult with beamline staff. Default 1 (no binning)
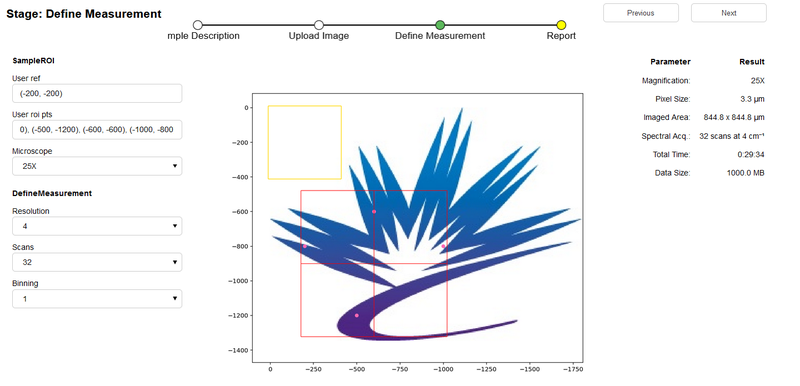
Parameter Result
As you change the parameters the summary on the right updates
Magnification: 25X with HiMag (125X)
Pixel Size: 0.7 μm
Imaged Area: 179.2 x 179.2 μm *seen on image as four red boxes
Spectral Acq.: 32 scans at 4 cm⁻¹
Total Time: 0:29:12
Data Size: 1000.0 MB
Pay attention to time. How much beamtime do you have? How many regions of interest do you need/want to scan? What parameters do you really need to be successful?
At the end a report is generated that beamline staff (mail-in) or you (remote access) can refer to during your beamtime.
Note, the report also estimates the size of the data collected. Please use this number to plan how data will be transferred (USB, Hard drive, OneDrive linke, etc)